So as I’ve been working on creating a premium portfolio block WordPress theme, one thing I wanted to have for the theme is a block or block pattern that allowed a user to show a specific blog post or portfolio project on a page. It would be a nice feature to help someone show off their best work.
And since we have the query block, it shouldn’t be that hard, right?
Wrong.
It turns out that you can’t yet select a specific blog post or other custom post type item with the query block.
So on the back of attending Nick Diego’s talk on creating a block in 15 minutes at WordCamp US, I decided to dive back into custom block development that doesn’t involve ACF Blocks.
And it turns out that it was easier than I thought it would be. It was still challenging, and I realized that I have really got to take a deeper dive into React. But I created the block for the theme.
And then I had the idea to break the block out into its own block plugin, add in variations for each custom post type and throw in a couple of block patterns for good measure.
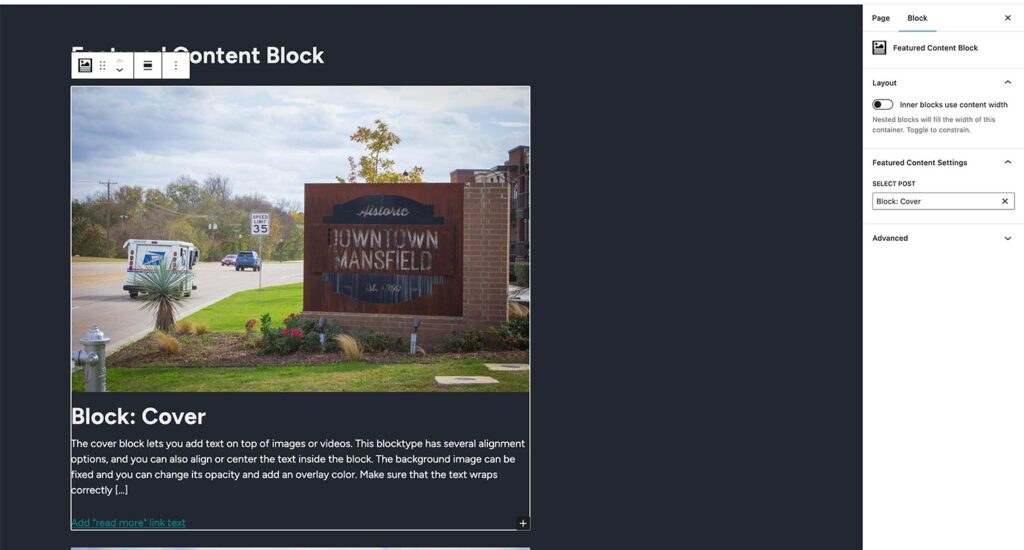
So here is how I created the Featured Content Block.
Table of contents
Scaffolding the block
The first thing that you need to do for the block is to create the plugin.
Now, when I first dived into block development back when Gutenberg was just a plugin in 2018, I had to do this by hand. And that was a challenge.
Now there’s a great command line tool to scaffold a block in mere minutes: npx create-block.
This tool will run and create a block plugin for you. And there are options for how it builds your block. If you run it straight up like that, it will give a series of prompts to create the plugin, from the name to the description to the author and more.
If you add the plugin slug to the end of it, it will create the plugin with that slug.
If you add --variant dynamic, it will make it a dynamic block, which uses PHP to show the block on the front end. There are a lot of other options which you can learn more about in the create-block documentation.
Since I was looking to create a dynamic block to show the post, I ran npx create-block --variant dynamic and let it do the rest.
Creating the base block
Once the block plugin was created, it was time to build the base block to show a specific blog post.
For this, I needed a few things. First, I had to get the block.json file set up, which I am absolutely in love with since it makes a ton of things so much easier. Anyway, the big thing to note in the block.json file is the attributes I have for postType, which has a default of post, and postId and then the context that it passes on, like the postId.
"attributes": {
		"postId": {
			"type": "number",
			"default": 0
		},
		"postType": {
			"type": "string",
			"default": "post"
		},
		"queryId": {
			"type": "number",
			"default": 100
		},
		"tagName": {
			"type": "string",
			"default": "div"
		},
		"namespace": {
			"type": "string"
		}
	},
	"providesContext": {
		"postId": "postId",
		"postType": "postType",
		"queryId": "queryId"
	},
That is crucial because that’s how the inner blocks we use for post title, excerpt, featured image, etc., will show the post we’ve selected and not the current page we’re editing/creating.
Second, I needed a set of Inspector Controls to put the dropdown to select the post or other post type item.
And finally, I needed to use inner blocks so that a user could add in any of the post template blocks they want to show their post how they want it to look.
Getting the posts into a select field
So the first thing I needed with the posts was to load them all into an array for the ComboboxControl element.
The good news is that WordPress has quietly added a core data module that allows us to grab posts and other information in JavaScript. I’ve only touched the surface with it, but I’ve discovered it’s pretty powerful.
 function getPosts() {
		 let options = [];
		 const posts = wp.data.select( 'core' ).getEntityRecords( 'postType', postType, { per_page: -1 } );
		 if ( null === posts ) {
			 return options;
		 }
		 posts.forEach( ( post ) => {
			 options.push( { value: post.id, label: post.title.rendered } );
		 } );
		 return options;
	 }
So with that, I’m able to pull in the posts for the post type without having to deal with an AJAX request or any of that, which is really nice. Then all of the posts are added to an array with the value being the post id and the label being the post title.
const inspectorControls = (
		 <>
			 <InspectorControls>
				 <PanelBody title={ __( 'Featured Content Settings', 'featured-cotent-block' ) }>
					 <ComboboxControl
						 label={ __( 'Select Post', 'featured-cotent-block' ) }
						 value={ postId }
						 onChange={ ( id ) => props.setAttributes( { postId: parseInt( id ) } ) }
						 options={ getPosts() }
						 onFilterValueChange={ ( inputValue ) =>
							 setFilteredOptions(
								 getPosts().filter( ( option ) =>
									 option.label
										 .toLowerCase()
										 .startsWith( inputValue.toLowerCase() )
								 )
							 )
						 }
					 />
				 </PanelBody>
			 </InspectorControls>
		 </>
	 );
From there, those values are added to the ComboboxControl element. And when a new post is selected, we save the new postId field in the block.
Using the inner blocks and passing the post id
Next, we need to add in the InnerBlocks element and pass the postId to those inner blocks to use to display the right information.
return (
		 <>
			 { inspectorControls }
			 <div { ...useBlockProps() }>
				 <InnerBlocks />
			 </div>
		 </>
	 );
The good news is that the InnerBlocks element is really easy to add to the edit screen for the block. The trick is that you need to add the following code to the save.js file in your src directory and also call that save file in the index.js file in order for the inner blocks to save correctly.
import { InnerBlocks, useBlockProps } from '@wordpress/block-editor';

 export default function Save() {
	 return (
		 <InnerBlocks.Content />
	 );
 }
Finally, to pass the postId value and postType value on to the inner blocks, you need to make sure you define the providesContext section in the block.json file.
"providesContext": {
		"postId": "postId",
		"postType": "postType",
		"queryId": "queryId"
	},
After this it was time to work on the front end side of the block.
Creating the PHP template for the block
Now that the editor side of the block was built out, it was time to create the front end of the block.
Like I mentioned earlier, I chose to use a dynamic block for this, which allows me to use PHP to create the block.
I also had help from the post template block included in WordPress. The code for it in GitHub was literally a lifesaver. I’m still not entirely sure what exactly all of these functions do for the block, but I can tell that they take the post id for the block and the inner blocks and rendered them out with the correct information.
$block_query_args = array(
	'posts_per_page'      => 1,
	'ignore_sticky_posts' => 1,
	'post__in'            => array( $block->attributes['postId'] ),
);
$block_query      = new WP_Query( $block_query_args );

if ( $block_query->have_posts() ) {
	$classnames         = get_post_class();
	$wrapper_attributes = get_block_wrapper_attributes( array( 'class' => implode( ' ', $classnames ) ) );
	?>
	<div <?php echo wp_kses_post( $wrapper_attributes ); ?>>
		<?php
		while ( $block_query->have_posts() ) {
			$block_query->the_post();

			$block_instance = $block->parsed_block;
			$block_instance['blockName'] = 'core/null';

			echo (
				new WP_Block(
					$block_instance,
					array(
						'postType' => get_post_type(),
						'postId'   => get_the_ID(),
					)
				)
			)->render( array( 'dynamic' => false ) );
		}
		?>
	</div>
	<?php
}
wp_reset_postdata();
The fact that this all worked on the first try was absolutely astounding. That’s something that never happens.
But with that, the base block was created and ready for use.
Adding the block variations
With the base block built out and showing the specific post on the front end, it was time to add variations so that this was available for publicly available post types (sans pages).
This part took a little bit more planning, and to be honest, it was the most challenging part of the build process.
Because I was going to have to get a list of post types that were available, I knew I wasn’t going to be able to use the default way for creating block variations through the block.json file.
But to create a block variation outside of the block.json file, you still need to use JavaScript. And from what I gathered in my research, trying to find what post types are available on a WordPress website is not possible in JavaScript.
function featured_content_block_get_post_types_list() {
	$post_types_args  = array(
		'public'             => true,
		'show_in_rest'       => true,
	);
	$post_types       = get_post_types( $post_types_args, 'objects' );
	$post_types_array = array();

	if ( $post_types ) {
		foreach ( $post_types as $post_type ) {
			if ( 'post' === $post_type->name || 'attachment' === $post_type->name ) {
				continue;
			}
			$post_type_array = array(
				'slug'  => $post_type->name,
				'title' => $post_type->labels->singular_name,
			);
			array_push( $post_types_array, $post_type_array );
		}
	}

	return $post_types_array;
}
So I ended up getting the list using the get_post_types function, creating an array of slugs and names for each post type and passing that onto another JavaScript file that would then cycle through that array and add each block variation. And crucially, it also sets the postType attribute for each variation to be that post type.
featuredContentBlock.postTypes.foreach( function( postType, index, arr ) {
	wp.blocks.registerBlockVariation( 'featured-content-block/featured-content-block', {
		name: postType['title'],
		attributes: { postType: postType['slug'] },
	} );
} );
And lo and behold, that actually worked. Not going to lie, I was surprised how well that worked the first time for me. That was a new one for me.
Building the block patterns
Finally, I wanted to add in a few block patterns that would make it easier for a user to just select a pattern, then select a post and be on their way.
I went with a simple column layout for the first pattern. This had a featured image, the post title and the post excerpt with a link to the blog post.
The next two patterns were basically variations of each other. They each had two columns: one column with the featured photo and the other column had the title, excerpt and link to the post. The only difference was one had the photo on the left and the other had the photo on the right.
Adding the code for the patterns was basically the same as what we had to do to add patterns to themes before WordPress 6.0 brought us the patterns directory in the theme folder.
register_block_pattern(
	'featured-content-block-patterns/featured-content-column-pattern',
	array(
		'title'         => esc_html__( 'Featured Content - Column', 'featured-content-block' ),
		'viewportWidth' => 370,
		'categories'    => array( 'featured-content-block-patterns' ),
		'description'   => 'A Featured Content Block in a column layout',
		'content'       => '<!-- wp:group {"className":"featured-content-column-pattern","layout":{"type":"constrained"}} -->
		<div class="wp-block-group featured-content-column-pattern"><!-- wp:featured-content-block/featured-content-block {"postId":1} -->
		<!-- wp:post-featured-image /-->

		<!-- wp:post-title /-->

		<!-- wp:post-excerpt {"moreText":"' . esc_html__( 'Read This Post', 'featured-content-block' ) . '"} /-->
		<!-- /wp:featured-content-block/featured-content-block --></div>
		<!-- /wp:group -->',
	)
);
And with all of that complete, it was time to submit it to the WordPress plugin directory. A day and a half later, it was added to the plugin directory!
Download the plugin and block today
Want to try out the plugin on your website or a website you’re building for someone? You can go ahead and download it over on the WordPress plugin directory. It’s completely free to use.
If you want to dive into the code to see what I did for yourself, or if you want to contribute to the plugin (it is open source after all), you can check out the GitHub repository.